

hacking files: The Birthday Dress
On my birthday this past week, I sewed myself a dress. And not just any dress… THE BIRTHDAY DRESS. I’d had an idea in my mind for a long time of the sort of dress I’d like to make (somewhat inspired by something I saw from Rennes long ago, though I can’t find the reference image now. Their collection of garments is incredible!), and I also knew I had some fabulous secondhand pink striped cotton sateen that was calling out to me. So, on the day I turned 26, I got to work!
This dress is a hack of the All Well Box Top, our latest sewing pattern. This pattern was designed with hacking in mind, so it felt special to be hacking my own pattern on my birthday, almost like a little gift to myself! To make this dress, you’ll need to start with the box top pattern (buy it here!), and then use the Box Top Instruction Booklet and pattern pieces in addition to this guide.

I’m so happy with how it turned out. Just the right statement piece to feel extra fancy and fun for a birthday. This dress is pretty over-the-top, and left me wishing I had some sort of over-the-top party to match my new party dress (maybe a plan for next year!). The lovely day of quiet sewing and reading I spent instead was just my cup of tea though, a birthday delight for this introvert. My favorite thing about this version of the dress is the way I got to play with stripe direction, especially given that the front panel is a continuation of the front bodice pattern piece. I’d love to make a more low-key version of the dress too, though. The next time I make the Birthday Dress, I think I’ll use a light-weight and super floaty fabric (for more of that Rennes look), maybe trying some subtle tonal colorblocking with the ruffle pieces and the bodice pieces.

Here’s how to make it:
Start with the All Well Box Top Sewing Pattern and select your desired size. You’ll need more fabric than is listed in the instruction booklet, probably somewhere in the ballpark of 1.5 - 2 extra yards on top of what’s in the chart, depending on how long a skirt you’d like and how wide your fabric is.
For a lot of this hack, you’ll be following the normal instructions for the “Ruffle Top” variation. Go ahead and read through the instructions for the Ruffle Top now so that you know what’s going on with it.

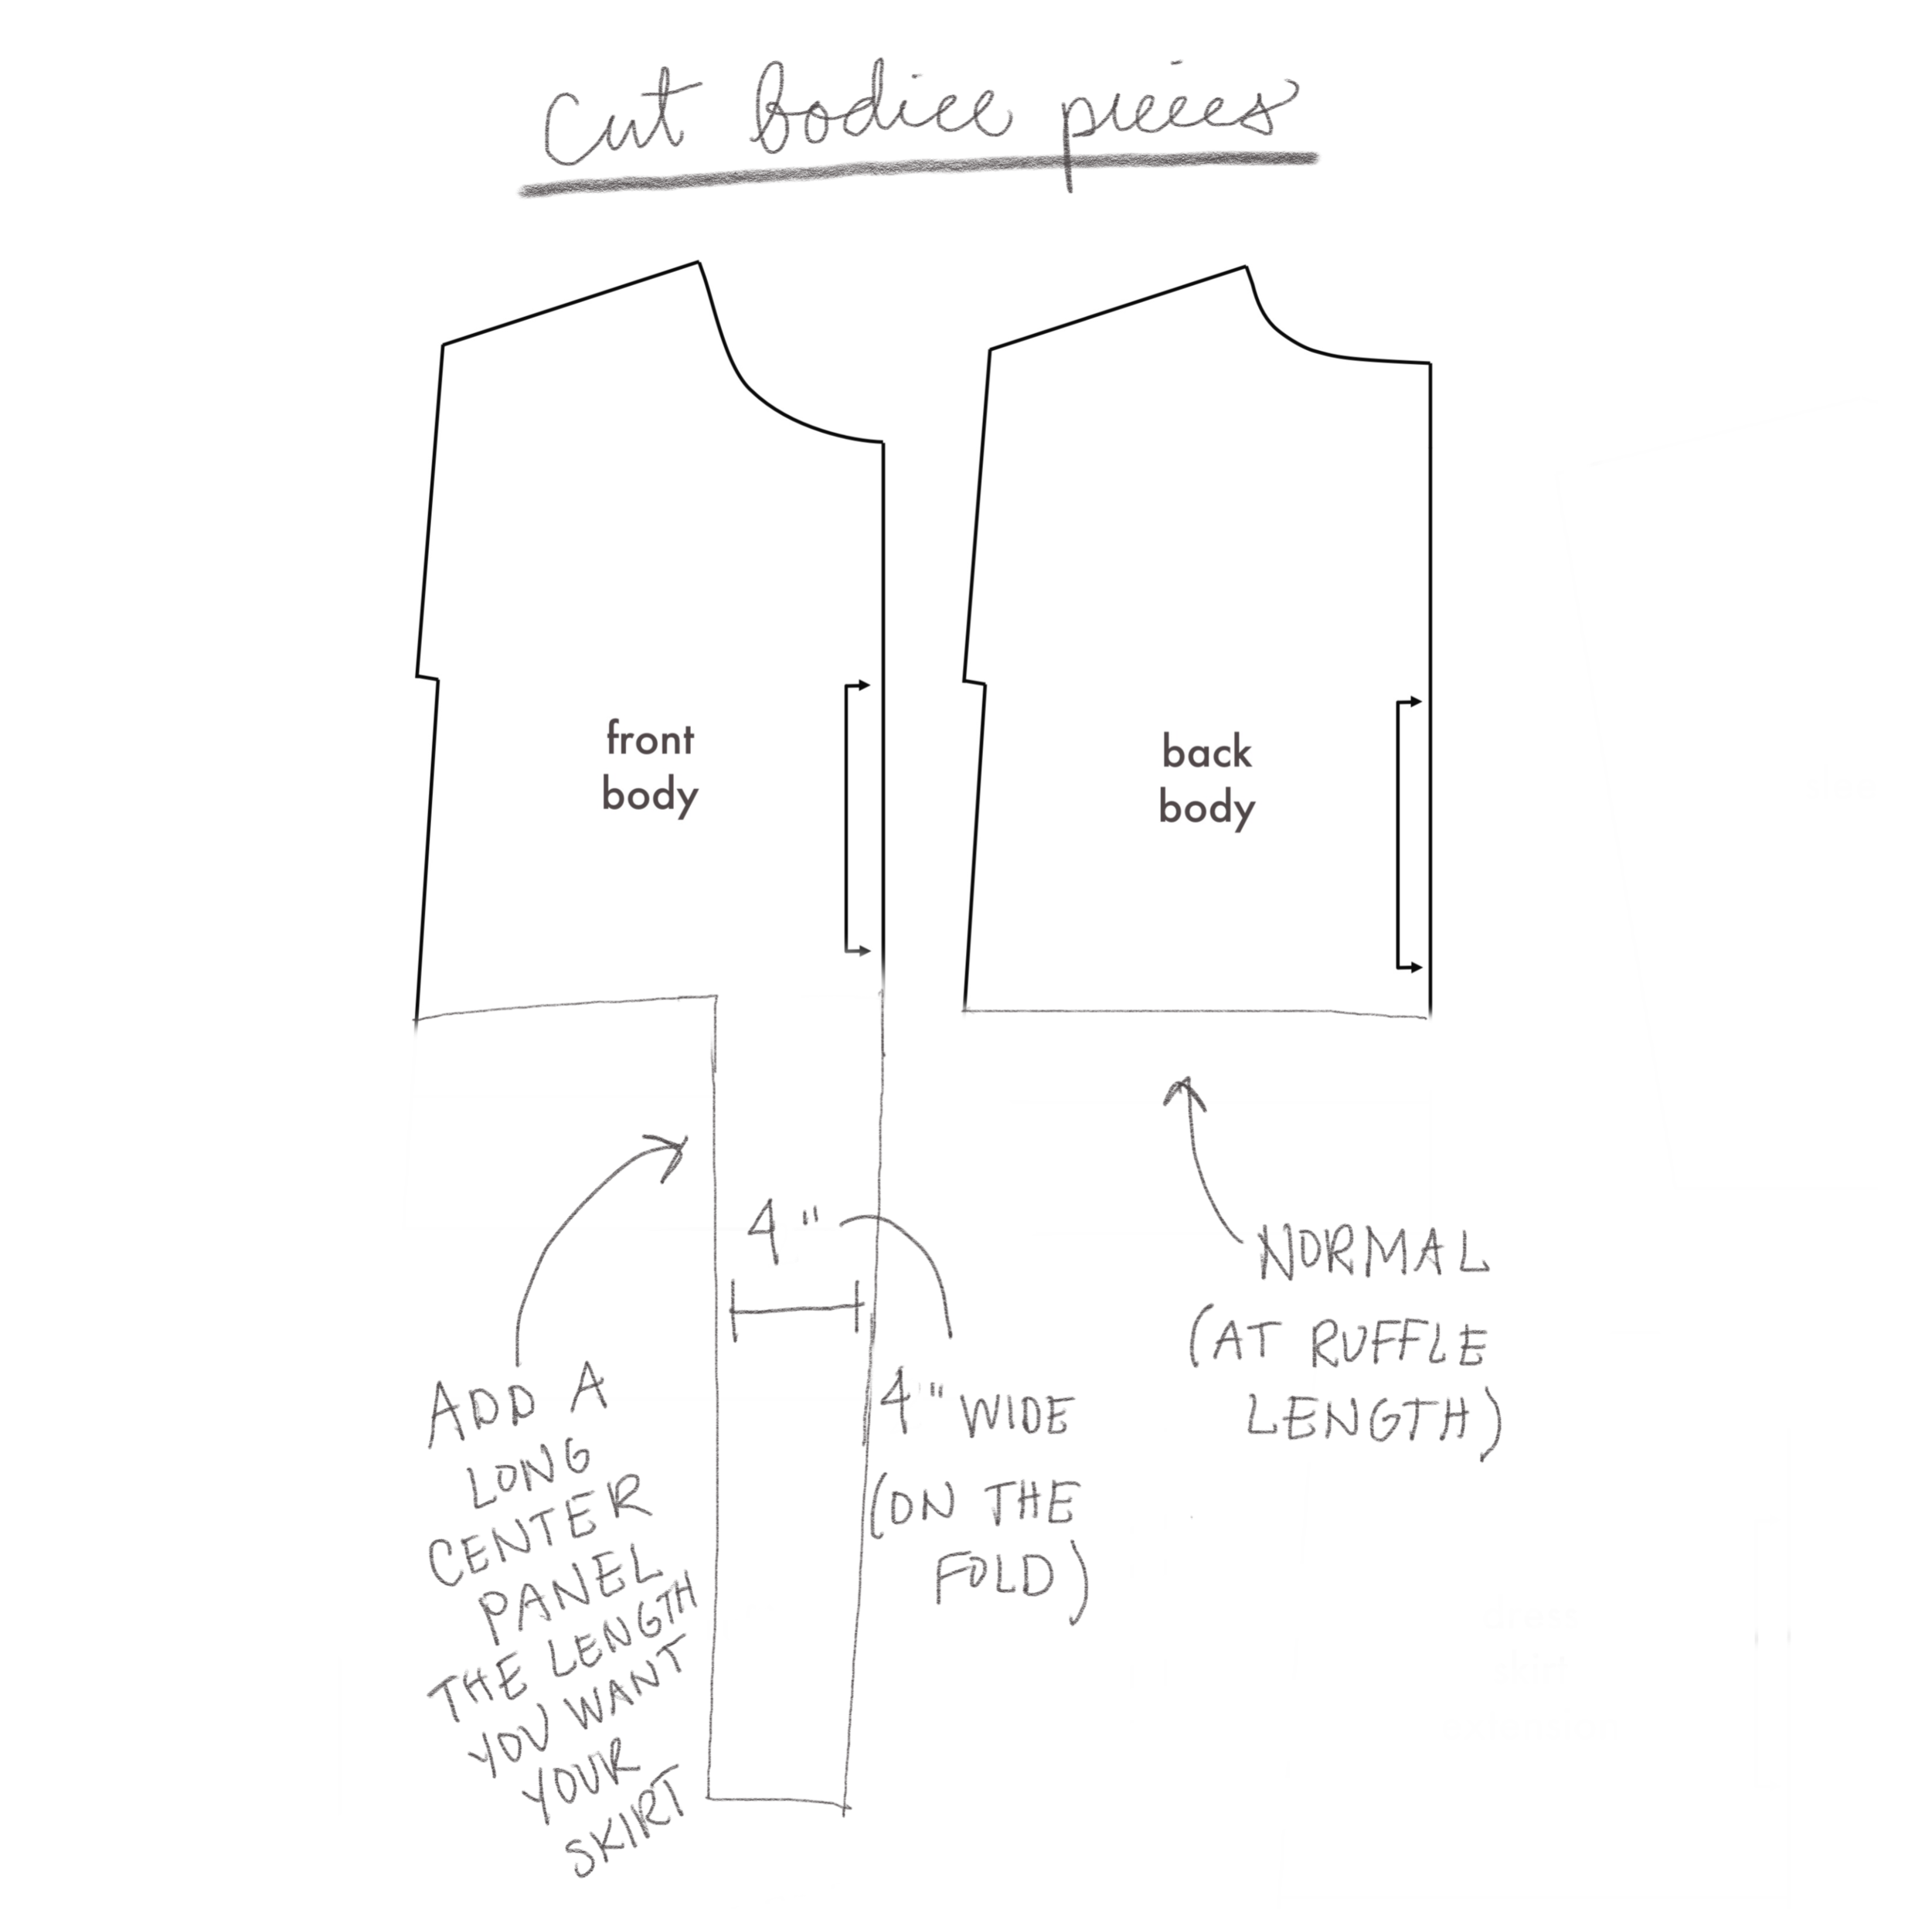
Cut your bodice pieces. You’ll cut the back body bodice piece normally on the fold, cropping it at the ruffle cut line, but the front body bodice piece will have a narrow vertical extension the to make the front bodice the intended length of your dress.
To figure out how long you’d like your dress to be: Use a measuring tape to measure from the spot right between your collarbones all the way down to wherever you’d like your dress to hit. (right above the knee? right above your ankles? tea length at mid-calf? mini at mid thigh? Up to you!). Write down this measurement, let’s call it DRESS LENGTH.
To figure out how much longer than the front bodice piece your center panel should extend, add 1/2” to your DRESS LENGTH measurement. Let’s call that measurement DRESS LENGTH +SA. Now, when you go to cut out your front bodice pattern piece, extend the length until the length along the center fold equals your DRESS LENGTH + SA measurement from neck to hem. The center panel should be 4” wide, and the rest of the front bodice should be cropped to the ruffle top cut line. Your new front bodice pattern piece will look like the super weird shape pictured below.
Now, cut your skirt pieces. Use the Ruffle Pattern Piece to get the width for the back skirt piece. To find the length, measure how long the center panel that you added to the front bodice pattern piece extends below the normal ruffle crop line and write that measurement down. This already includes hem seam allowance. Let’s call that measurement SKIRT LENGTH.

TIP: Make your SKIRT LENGTH longer if you’d like to make a deep hem! This length only accounts for 1/2” hem seam allowance, aka a 1/4” double turned hem. A deep hem could look really lovely on this dress, though! I ended up using a super deep hem (like 6”) because I initially made my skirt very long and shortened it after the fact (keeping some of that length intact in the deep hem in case I want to let it back down later!). For a deep hem, just choose how deep you want the hem to be, multiply that by two (since it will be folded in half!) and add 1/4” for the bit you’ll turn under on the inside (unless you’d rather serge it.). More on Deep Hems in the All Well Box Top Hacking Guide! It comes with the pattern!
Add 1/2”to SKIRT LENGTH to account for the seam allowance to connect the skirt to the bodice. Let’s call this measurement SKIRT LENGTH + SA.
For the back skirt piece, cut a rectangle that is the normal width of the pattern piece and the length of SKIRT LENGTH + SA. Make sure to cut on the fold like the pattern piece indicates!
For the front pattern pieces, fold the ruffle pattern piece roughly in half (maybe a little less than half like in the illustration below, it depends on how dramatic you want your front gathers to be. The more width, the more dramatic the gathers.). Cut TWO front skirt pieces on the fold, roughly half the width of the ruffle pattern piece and the length of SKIRT LENGTH + SA.

Now, follow the instructions in the All Well Box Top instruction booklet “ruffle top” variation to sew the bodice of the dress. Refer back to this post once you get to the part about attaching the ruffle. Your work should look like this, like a very cropped top with a weird tail hanging down the front.
TIP: You may want to add two long ties to your dress at this point to add more shape and versatility. I used twill tape to add ties to mine and I love the way it looks! If you’re adding ties, sew them into the side seams 1/2” above the bottom edge of the bodice so that they will appear right above the ruffle line on the finished dress. They should each be the same length (start with them longer than you think you need them!) and should be sewn so they stick out away from the dress. This isn’t in the illustrations but you can see the twill tape tie in my photos above.

Now, prepare your skirt. Make sure you read the normal instructions for attaching the ruffle in the instruction booklet as we will use the same procedure and there are more details in the booklet, but make sure to follow the steps in this guide to achieve the look for the Birthday Dress. There are a few key differences!
First, sew the two front skirt pieces to either side of the back skirt piece with right sides together until they form a wide rectangle with two seams like illustrated below. (PS: this is a great time to add inseam pockets if you’d like! You can find instructions for inseam pockets in the “Box Dress” variation of the All Well Box Top pattern! Position the inseam pockets about 2.5” below the top of the skirt.) Finish seams as desired.
In the normal ruffle top variation you make just one long line of gathering stitches across the entire length of the ruffle, but here we will do things a little differently. Make a separate set of two lines of gathering stitches for each of the three pieces of the skirt so that each can be adjusted as needed to get the gathers just right. Refer to the instruction booklet for how to sew and gather gathering stitches.

Start by gathering the back piece of the skirt, matching it to the width of the back piece of the bodice. Once you match the widths, sew the gathered skirt to the back of the bodice with right sides together and a 1/2” seam allowance.
Next, gather the front skirt pieces. Gather until the front skirt widths match the widths of the front bodice between the side seams and the center panel PLUS 1/2” seam allowance left on the side of the skirt. This is how you will sew the skirt to the center panel! (Highlighted in yellow below).

Now we are going to attach the sides of the skirt to the center panel! Snip about 3/8” into the corner of the center panel diagonally as pictured in the illustration below. This will help you sew this pivoting seam, because you will first sew the skirt to the bodice, then you will fold the skirt down and push the seam allowance through the gap made by the snip so you can sew the center panel to the side of the skirt with right sides together and no gap at the corner! It sounds tricky, but I’ll walk you through with some illustrations below!

Sew the gathered front skirt to the bodice with right sides together and a 1/2” seam allowance all the way up until you reach the spot where you snipped the corner of the bodice. Your 1/2” seam allowance should still be free and unsewn on the side of the skirt.

Flip the skirt down and fold the front bodice sort of in half, pushing the skirt’s seam allowance to the other side so that the right sides of the side of the skirt and the side of the center panel can meet with 1/2” seam allowance free.

Sew the side of the front skirt and the side of the center panel with right sides together and a 1/2” seam allowance, making sure (by flipping over the top seam allowance) that the spot that you snipped has been fully caught in the seam and you’re not leaving an accidental hole in the corner. Press well. Finish all seams as desired (probably not french seams, would get quite complicated here!) and repeat on the other side.
Now all you have to do is hem the dress and add any finishing touches and you are DONE! Hooray!!!
Thanks for making the All Well Birthday Dress, and thanks for using the All Well Box Top pattern! We would love to see what you made! If you post on Instagram, use the hashtags #allwellboxtop and #allwellbirthdaydress and tag us at @allwellworkshop so we can re-share what you post!
Hooray! Happy Birthday! Happy Normal day! Happy whatever day it happens to be!
